How to add business hours to Facebook page?

Adding your business hours to your Facebook page not only helps customers know when you are open, but also creates a professional and trustworthy impression. With a few simple steps, you can update this information so that customers can easily access your services at the right time. The following article from RentFB will guide you on how to add business hours to facebook page.
How to add business hours to Facebook page
Step 1: To help customers easily grasp your business’s operating hours, you can add or edit your business hours directly on your Facebook Page. Here are the detailed steps to do it:
Step 2: Log in to your Facebook account. On the main interface, click on your avatar located in the upper right corner of the screen to open the options menu.
Step 3: In the menu that appears, click View all profiles. Here, you will see a list of Pages that you manage. Select the Page whose hours you want to add or change.
Step 4: After selecting the Page, click on the Page’s profile picture (located in the upper right corner). Next, click on the Page name to access the Page’s main interface.
Step 5: On the Page interface, find and click on About. Then, select Contact and Basic Information to display all information related to the Page, including business hours.
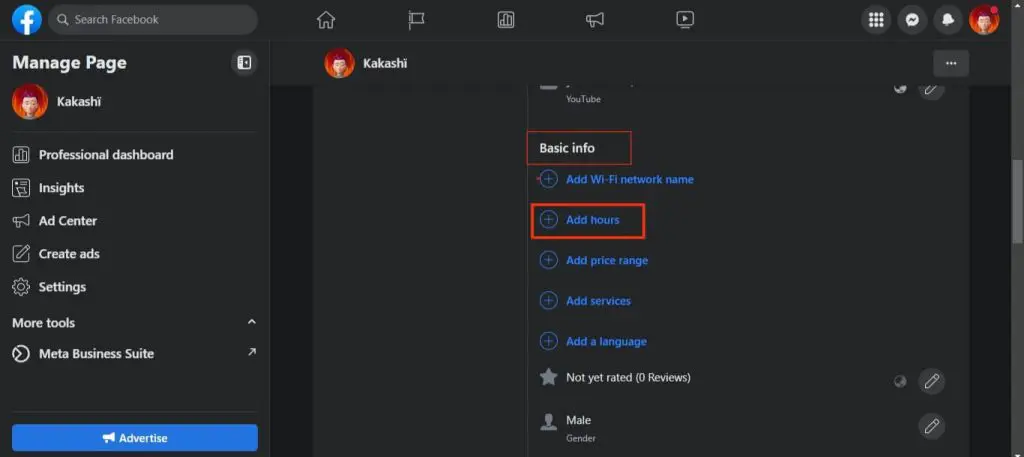
Step 6: Under Contact and Basic Info, click Add Business Hours.
- If your Page doesn’t have business hours yet, you can enter new information by selecting Open during certain hours.
- If you already have business hours but need to edit them, simply choose the hours that suit your business needs.
In the edit interface, you will see the hours corresponding to each day of the week. Enter the specific hours of operation on the days your business is open. If you need to add more hours in a day, click the + icon to add more hours.
Step 7: After completing entering or editing working hours, click Save to update the information.
Note:
- Providing accurate business hours makes it easy for customers to know when you’re available, enhancing the customer experience.
- If business hours change seasonally or for special occasions, be sure to update regularly to keep information accurate.

See more business addresses and Facebook pages
Adding your address and map location to your Facebook Page not only makes it easier for customers to find your business, but it also adds credibility and professionalism to your Page. Here are step-by-step instructions to help you do it:
Step 1: Log in to your personal Facebook account. On the main interface, click on the avatar located in the upper right corner of the screen to open the options menu.
Step 2: In the menu that appears, select See all profiles. You’ll see a list of Pages you manage. Click the Page where you want to add your business address and map location.
Step 3: Once on the Page, click on the Page’s profile picture located in the upper right corner of the screen. Then, click on the Page name to go to the main interface of the Business Page.
Step 4: On the Page interface, you will see a menu located below the profile picture and Page name. Here, click on About to access basic information and contact information of the business.
Step 5: Under About, go to Contact and Basic Info, then click Add Your Address.
Step 6: When the edit window opens, enter your full business address, including:
- Street name
- District
- City
- Postal code (if available)
This makes it easier for customers to locate your business more accurately.
Step 7: After entering the address, look at the map displayed below. The Pin will automatically appear at the location corresponding to the address you just entered.
- If the pin location is incorrect, you can correct it by finding the address on the map.
- Click directly on the correct location on the map to reset the pin.
Step 8: Once you are sure the address and location on the map are correct, click the Save button to finish.
How to show absent status on Facebook page?
Automatically setting your out of office messaging status outside of business hours is a great way to maintain professional communication with your customers. With Facebook access or work access to a new Page, you can do this through Meta Business Suite. Here are step-by-step instructions:
Step 1: Go to Facebook and log in to your account. On the main interface, click on the avatar located in the upper right corner of the screen to open the options menu.
Step 2: In the menu that appears, select See all profiles, then click the name of the Page for which you want to set your time off.
Step 3: Once on the main interface of the Page, click on the … icon (usually located in the upper right corner of the screen). Next, go to the Automation section and click on it to access the messaging automation options.

Step 4: Set up away message
- If this is your first time setting up an away message:
In the Suggestions for you section, navigate to Away messages and click Try Now to get started. - If you’ve created an out of office message before:
Find the Out of Office Messages section in the Automations list and click Edit next to it to change or update the settings.
Step 5: Schedule your absence
- Select Absence Dates: Under When this happens, select the days you want to schedule your absence by checking the boxes that correspond to the days of the week.
- Select time zone: Below the date list, click the drop-down menu and select the time zone appropriate for your locality or region.
- Set up out of office hours: Click the drop-down menu next to each day to enter the Start Time and End Time for your out of office status. If you need to add more time slots for the same day, click Add another time slot and repeat the hours entry.
Once you’ve finished setting up your time off, click the Save Changes button located in the bottom right corner of the screen.
Step 7: Add or remove absence time
- If you want to add more absence slots, repeat the above steps.
- To delete a set absence period, click the … icon next to the period you want to delete.
With the above steps, you have completed adding or changing business hours on your Facebook Page easily and professionally. Hopefully the experiences we share can help you. Good luck everyone!
Contact Info
Information about “How to add business hours to Facebook page” hopes to provide you with additional necessary knowledge. At Rent FB, there is a team of highly qualified and experienced staff and experts who will provide facebook agency ad account rent as well as support when you run Facebook ads. Contact us via phone number.
Frequently Asked Questions
To edit your Facebook Page’s hours, you’ll need to follow a few simple steps. First, log in to your Facebook account and go to the Page you want to edit. On the Page interface, click About, then select Contact and Basic Info. Here, you’ll see the option to Add hours or edit existing hours. You can choose specific hours for each day of the week by entering the start and end times. If you need to add or edit different times of the day, you can click Add another time. When you’re done, don’t forget to click Save to update the information. Editing your hours makes it easier for customers to know when your business is open.
Editing the time of a post on your personal Facebook profile is just a few simple steps. First, go to your personal page and find the post you want to edit. Click the three dots icon in the upper right corner of the post, then select Edit Post. Here, you can change the content and customize other information. If you want to edit the time, click Change Post Time (if this option is available), then enter the desired time. Finally, click Save to finish. This feature gives you more control over your Facebook posting history.