How to Create Catalog on Facebook

A catalog is a collection of all the items you want to promote on platforms like Facebook. Once you create a catalog, you can use it for a variety of purposes within your business, such as displaying products in collection ads or tagging products on Instagram. In this article, RentFB will guide you how to Create Catalog on Facebook, uploading items to a catalog, and tips for optimizing your catalog’s performance on the Facebook platform.
Learn about categories on Facebook
Catalogs are an important tool in Facebook advertising and sales campaigns, helping businesses store and manage information about products, services or content they want to promote. Using catalogs not only helps to organize and classify business items scientifically, but also optimizes the effectiveness of the customer approach process. You can create different catalogs to easily manage product types, such as e-commerce, fashion, electronics, home appliances and many other categories. This helps you easily adjust and classify products according to customer needs, while creating professionalism for your online store.
Facebook Commerce Manager provides a flexible platform that allows you to build, manage, and customize your product catalog across your online channels. From there, you can easily sync your product catalog across platforms like Facebook, Instagram, Audience Network, and Messenger. This helps you optimize your advertising campaigns, increase sales, and reach the right potential customers.
How to Create Catalog on Facebook
To create and manage your product catalog on Facebook, you’ll use Commerce Manager, a professional tool for organizing and promoting your products. However, you can also quickly create a catalog and grant access to others through Business Manager on Meta. Here’s a step-by-step guide:
- Step 1: Go to Business Manager, open Business Settings to start the process of creating a catalog.
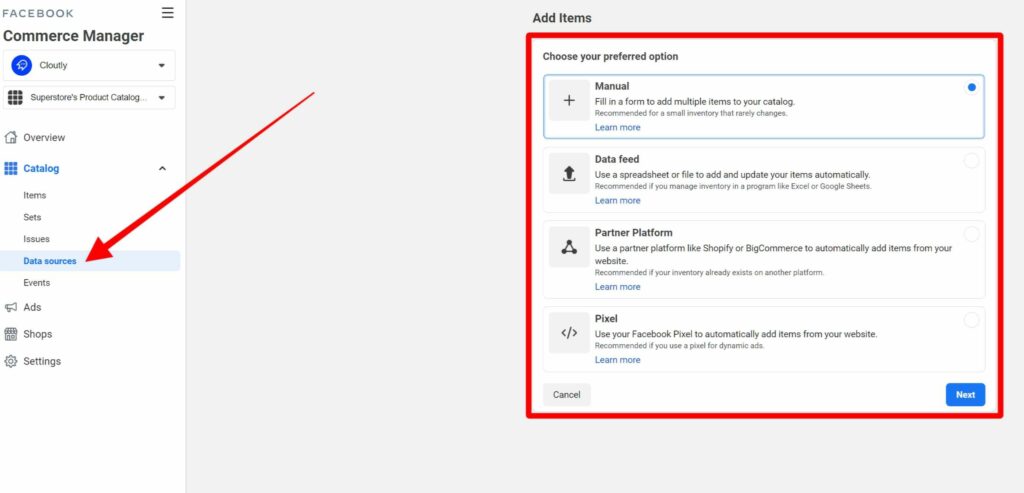
- Step 2: In the settings interface, find and select Data Sources. This is where you manage all data sources related to your business.
- Step 3: After entering Data Sources, select Categories to start the process of creating a new category.
- Step 4: Click the Add button and select Create New Category. This is the step to create a category that contains the products or services you want to promote.
- Step 5: You will be asked to name your catalog and select the type of item you want to promote, such as fashion products, electronics, or services. Once done, select Create Catalog.
- Step 6: After creating a catalog, you can grant access to other individuals in Business Manager. Select the person’s name on the left, then select access on the right. You can grant Create Ads or Manage Catalog permissions, then click Assign. If you don’t want to grant permissions, you can select Cancel to skip it.
- Step 7: Next, you can choose any Meta Pixel or App SDK to connect to your catalog to track and analyze your ad performance. If you don’t have one or want to set it up later, you can choose Cancel to skip this step. If needed, you can learn more about connecting a Pixel or SDK to your catalog.
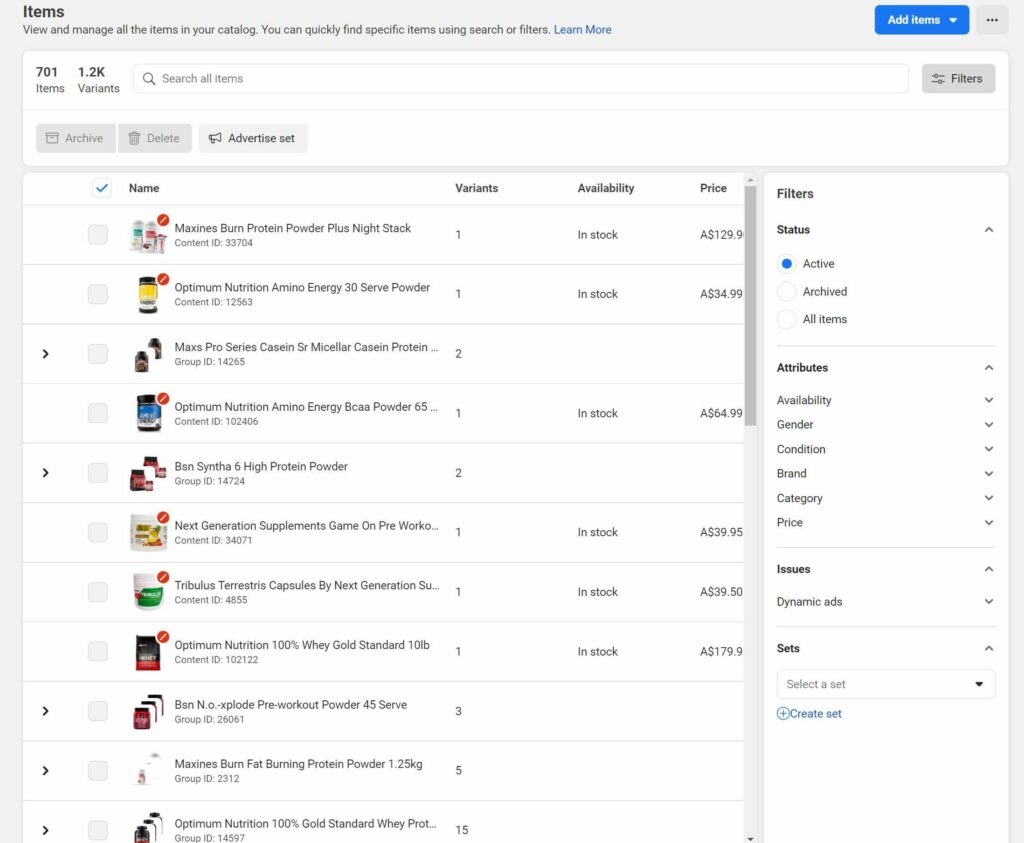
- Step 8: Once you have completed the above steps, you have created your catalog. Now, go to Commerce Manager to add products, manage and optimize your catalog. From here, you can track your ad performance, update product information and adjust your campaigns for best results.
If possible, keep all your items in a single catalog instead of creating multiple catalogs. This simplifies ad management and optimization.

Benefits of creating a Facebook catalog
After creating a catalog, managing and optimizing your business items is an important step to ensure effective promotion and sales. Below are specific steps you can take to maintain and develop your catalog scientifically and effectively:
Can create groups or collections
Grouping related products together helps optimize promotion and attract customer attention. For example:
- Group products by theme: Products with the same theme such as winter fashion, technology accessories, or kitchen appliances.
- Seasonal Collections: Products that launch at the same time or seasonally, such as spring, summer collections, or holiday promotions. Grouping allows you to launch focused advertising campaigns and makes it easier for customers to find the products they are interested in.

Customizable country and language configuration
Your catalog may serve customers in many different countries. Therefore, configuring country and language configurations is necessary to optimize the user experience. Each country will have its own price, language, and product description information, making it convenient and easy for customers to view product information.
Synchronize data in one file for management
If you sell a single product like shoes, it’s more efficient to manage all related products in a single category. Having all your data in one file not only makes it easier to keep track, but also:
- More accurate customer care and advice: Easily search for product information to answer customer questions.
- Effective sales planning: Build advertising strategies, promotions or set up a Facebook Shop faster and more efficiently.
Effective catalog management helps you optimize every aspect of your product marketing campaign, from managing insights, product groups, and access, to setting up multilingual experiences for international customers.
Get detailed updates on item information
You can easily update detailed information for each product in the catalog. Including:
- Title: Create an attractive and clear title that helps customers easily recognize the product.
- Selling Price: Update selling price accurately, reflecting current listed price or promotion.
- Uses and descriptions: Provide detailed information about the product’s features and uses, helping customers better understand the value the item brings.
- Images and designs: Upload high-quality images that clearly show the designs, colors, and styles of each product.
- Variations: You can also manage variations like size, color, or special editions for each product.
You can choose to add products manually (one product at a time) or upload items in bulk using a data file, saving time and effort.
Easily manage access rights
When you need to collaborate with team members or partners, you can grant them access to your portfolio so they can manage and optimize together. Depending on the level of your work, you can:
- Assign management permissions: Allow others to edit, add products, or manage the entire catalog.
- Assign ad creation permissions: If you only want someone else to be in charge of advertising, you can limit permissions so they don’t interfere with the catalog and only run promotional campaigns.
Using a product catalog on Facebook not only makes your store look more professional, but it also has many other benefits such as increasing customer engagement, expanding your reach, improving the shopping experience, and boosting conversion rates. Take advantage of this feature now to enhance your store’s competitive advantage on Facebook.
Contact Info
Information about “How to Create Catalog on Facebook” hopes to provide you with additional necessary knowledge. At Rent FB, there is a team of highly qualified and experienced staff and experts who will provide rent facebook agency ad account as well as support when you run Facebook ads. Contact us via phone number.
Frequently Asked Questions
Promoting your product catalog on Facebook is an effective way to increase your visibility and drive sales. To do this, you first need to create a product catalog in Commerce Manager. Then, when creating your ad, select “Product Catalog Ad” to display the items in your catalog. You can customize your target audience, budget, and ad duration. In particular, use attractive images and detailed descriptions to attract customers’ attention. By optimizing your ad campaign, you can maximize your conversion rate and increase your store’s revenue.
To delete a product catalog on Facebook, you’ll need to go to Business Manager and select “Data Sources” in your business settings. Next, find the catalog you want to delete and tap “Delete” next to its name. Facebook will ask you to confirm your decision. Once you confirm, the catalog will be deleted from your account. Note that deleting a catalog cannot be undone, so make sure you no longer need it before doing so.