How to create an ads manager account

Facebook Business is an effective tool to support users in advertising, helping to improve business performance on this platform, whether you use a mobile phone or a computer. Let’s learn with RentFB to know how to create an ads manager account on Facebook to reach a better number of potential customers.
Learn about Facebook Ads Management Account
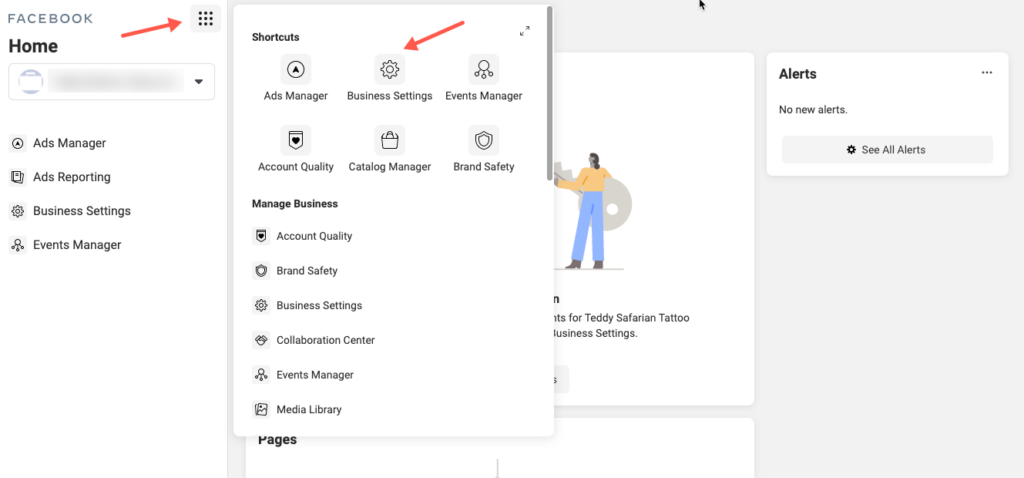
Facebook Business, also known as Facebook Business Manager, is a powerful tool for advertisers and businesses to manage and optimize advertising campaigns on the social networking platform. It is the ideal solution for those who want effective and detailed control over their marketing activities on Facebook.
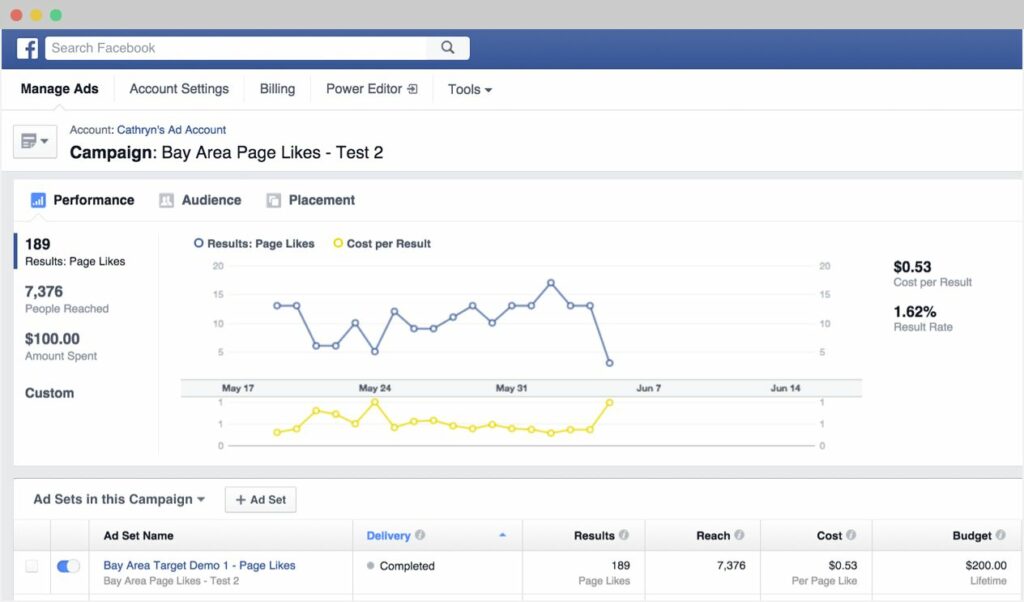
Facebook Business offers a comprehensive interface that allows users to easily monitor, analyze, and adjust advertising campaigns. This tool helps you control advertising budgets, track the performance of posts and ads, and analyze data to optimize marketing strategies. In addition to managing advertising campaigns, Facebook Business also allows you to share access to advertising assets with people on your team, vendors, or business partners. This enhances collaboration and ensures that all stakeholders can contribute and track the progress of advertising campaigns effectively.
With Facebook Business, you can easily delegate permissions to team members, giving them access to the tools and data they need to execute and optimize advertising activities. This not only saves time but also ensures that campaigns are deployed in a synchronous and consistent manner, thereby improving efficiency and minimizing unnecessary errors in the advertising process. Facebook Business is an indispensable tool for businesses and advertisers, helping to manage and optimize the entire advertising process on Facebook effectively and professionally.

What is the difference between a business advertising account and a personal account?
Many people are currently wondering about the difference between Facebook Business and personal advertising accounts. To understand the difference between these two types of accounts, you can refer to the detailed comparison table below:
Personal and Facebook Business advertising accounts each have their own advantages and disadvantages. Personal accounts are generally easy to set up and are suitable for individuals or small businesses that are new to Facebook advertising. However, personal accounts are limited in managing multiple ads at once and do not support advanced features such as detailed data analysis and in-depth advertising campaign optimization.
In contrast, Facebook Business offers a range of powerful tools and features for businesses. With Facebook Business, you can manage multiple Facebook ad accounts and pages from a single location, easily analyze the performance of your ad campaigns, and access professional optimization tools. This is especially useful for large businesses or those running multiple ad campaigns across multiple pages.
So, which is better, a personal ad account or a Facebook Business account? In fact, both can be equally effective, depending on your needs and scale. If you’re just starting out and advertising a small product or service, a personal account might be a good choice. However, if you’re running multiple ad accounts and managing multiple Facebook pages, Facebook Business is a better tool to help you organize and optimize your ad campaigns more effectively.
You can start with a personal account and switch to Facebook Business as needed to take advantage of the advanced tools and features the platform offers.
How to create an ads manager account
To create a business account on Facebook Business, you can follow the detailed steps below:
Step 1: Access the Facebook Business page
First, you need to access the Facebook Business website at https://business.facebook.com/. On the main interface of the page, click on “CREATE ACCOUNT” located in the upper right corner of the screen. This is the first step for you to start the process of creating a business account.
Step 2: Fill in account information
When you click on “CREATE ACCOUNT”, the system will take you to a registration form that requires you to fill in the necessary information completely and accurately. This information usually includes the business name, your name, email address and some other relevant details. After completing the information, click on the “Submit” button to continue creating a Facebook business account.
Step 3: Verify your account via email
Immediately after submitting your information, the Facebook system will send a confirmation email to the Gmail address you provided. You need to access your Gmail inbox and click on the confirmation link in the email to complete the account information verification according to the instructions provided in the email.
Step 4: Set up basic settings
After successfully confirming your account, return to the Facebook Business page and proceed to set up the basic settings needed for your business’s advertising activities. This includes configuring basic parameters related to your business and advertising settings.
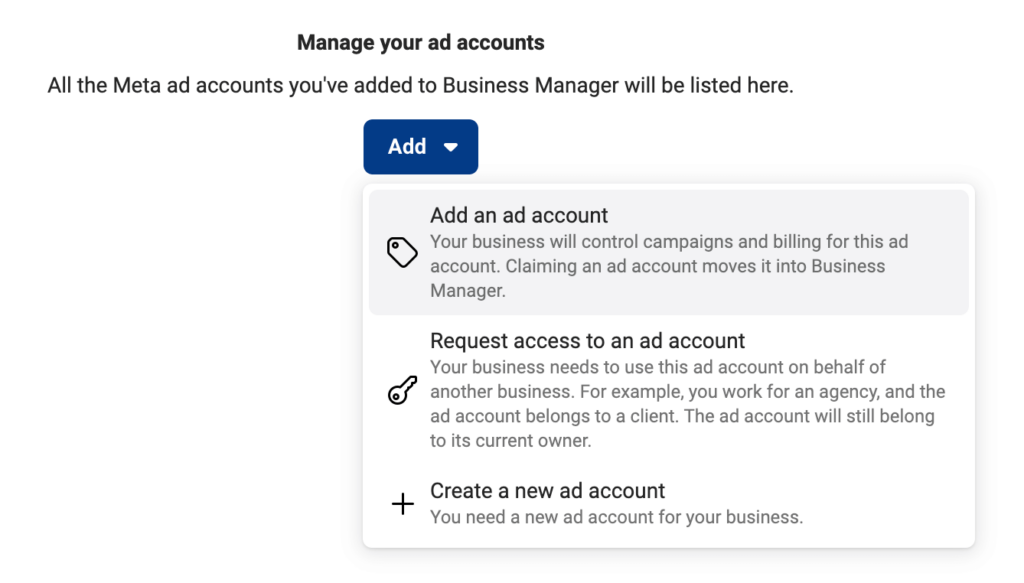
Step 5: Add an Ad Account
Once the basic setup is complete, you will need to add an ad account to start running ad campaigns. If you do not have an ad account yet, click on the “Create a new ad account” option to continue.
Step 6: Fill in the information for the advertising account
Next, you will be asked to enter the information related to the business advertising account into the form displayed on the screen. After filling in all the information, click the “Next” button to move to the next step.
Step 7: Choose a payment method
You need to choose the appropriate payment method for your ad account. Facebook offers a variety of payment options, such as credit card or debit card. Choose the appropriate payment method and click “Next” to continue.
Step 8: Provide payment information
You need to fill in the payment card information accurately in the required fields. After entering, click the “Save” button to complete the process of creating a Facebook business account and advertising account.
Once you complete these steps, your business account will be set up and ready to launch Facebook ad campaigns.

Creating a Facebook business account helps you manage multiple Fanpages at the same time more effectively. Facebook Business also provides the ability to work flexibly on both phones and computers, supporting you to easily coordinate with colleagues and partners to manage data optimally. Hopefully the information in the article will help you improve the effectiveness of the advertising process!
Contact Info
Information about “How to create an ads manager account” hopes to provide you with additional necessary knowledge. At Rent FB, there is a team of highly qualified and experienced staff and experts who will provide rent facebook ad account as well as support when you run Facebook ads. Contact us via phone number.
Frequently Asked Questions
Để thêm tài khoản quảng cáo vào Page trên Facebook, bạn cần thực hiện các bước sau: Đầu tiên, đăng nhập vào Facebook và truy cập vào Trang của bạn. Từ đó, vào phần “Cài đặt” của Trang và chọn “Tài khoản quảng cáo”. Tiếp theo, nhấn vào “Thêm tài khoản quảng cáo” và làm theo hướng dẫn để liên kết tài khoản quảng cáo mà bạn muốn sử dụng. Sau khi hoàn tất, tài khoản quảng cáo sẽ được liên kết với Trang của bạn, cho phép bạn quản lý và triển khai các chiến dịch quảng cáo trực tiếp từ Trang đó.
Trình quản lý quảng cáo Meta là công cụ mạnh mẽ giúp bạn tạo, quản lý và tối ưu hóa các chiến dịch quảng cáo trên các nền tảng của Meta như Facebook và Instagram. Với giao diện trực quan, công cụ này cho phép bạn thiết lập mục tiêu quảng cáo, chọn đối tượng mục tiêu, điều chỉnh ngân sách và theo dõi hiệu suất quảng cáo một cách chi tiết. Bằng cách cung cấp các báo cáo phân tích và công cụ đo lường chính xác, Trình quản lý quảng cáo Meta giúp bạn tối ưu hóa chiến dịch và đạt được kết quả quảng cáo tốt nhất.