How to add email list to Facebook ads

Facebook Ads are not only effective in reaching potential customers, but they also help you leverage your existing email list for more precise targeting. Adding an email list to your Facebook Ads allows you to create personalized campaigns, increasing engagement and conversion rates. Here is a detailed guide how to add email list to Facebook ads from RentFB to help you quickly and effectively.
How to add email list to Facebook ads
Facebook advertising has become a powerful tool for businesses to connect with potential customers and increase sales. One of the most effective ways to improve your advertising campaigns is to use your existing email list for more precise targeting. By adding your email list to your Facebook ads, you can create personalized marketing campaigns, optimize your reach, and increase your conversion rates. This article will guide you step by step on how to add your email list to your Facebook ads.
Step 1: Prepare email list
Before you begin, you need to prepare an email list of the customers you want to target. Make sure that this email list was collected legally and that you have the consent of the people on the list to send you marketing communications. Make sure that your data is clean, deduplicated, and that the email addresses are properly formatted.
Important Note: Facebook requires email lists to be uploaded as CSV or TXT files. Columns in the email list need to be clearly categorized (e.g. column for email, column for name, etc.).
Step 2: Access Facebook Ads Manager
To get started, you’ll need to go to Facebook Ads Manager. Make sure you’re logged into your Facebook account and have access to your business’s ad account.
- Access Facebook Ads Manager from Business Manager.
- If you don’t already have an advertising account, you’ll need to create one before continuing.
Step 3: Create a custom audience with an email list
Facebook offers a Custom Audience feature, which allows you to upload an email list and target people whose emails are on your list.
- In Ads Manager, select the Audiences tab from the left menu.
- Select Create Audience and then select Custom Audience.
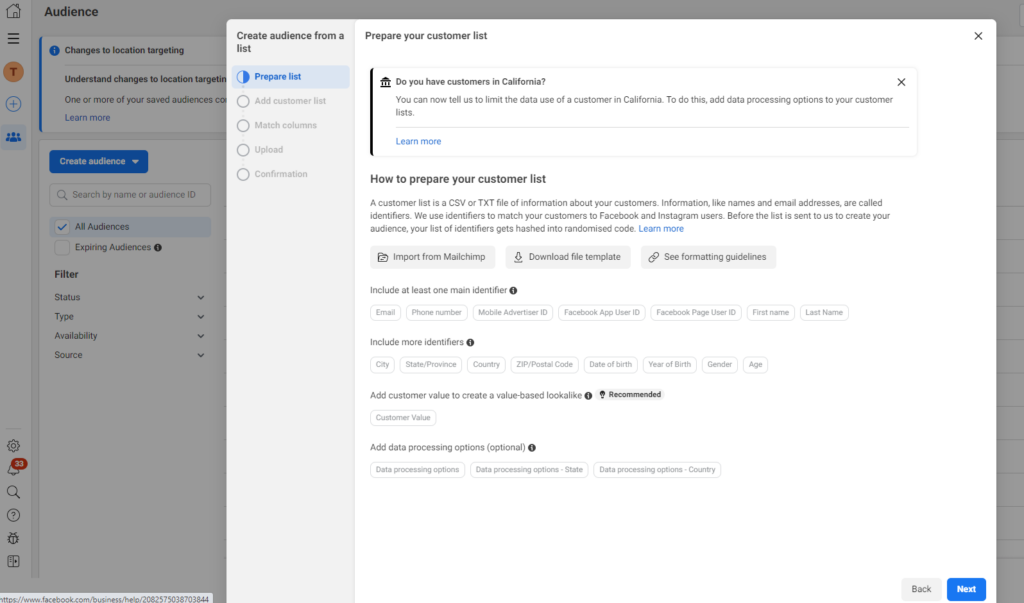
- In the pop-up window, select Customer List. This is where you will upload your email list.
- Select Upload your customer list and click Next.
Step 4: Upload email list
Now you need to upload your email list to Facebook.
- Select the CSV or TXT file containing the email list and upload it.
- Facebook will ask you to specify the types of data in the file. You can specify that your file contains Email, and you can add other data fields if you want, such as Name, Phone Number, etc.
- Once done, click Upload.
Facebook will process your email list and create a Custom Audience from people whose emails match their Facebook accounts. This process may take a few minutes depending on the size of your list.

Step 5: Create an ad campaign with a custom audience
Once your email list has been uploaded and your custom audience has been created, you can start creating Facebook ad campaigns targeting this audience.
- In Ads Manager, click Create Ad.
- Choose an ad objective that fits your goals (e.g. brand awareness, increase conversions, etc.).
- In the Campaign Audience section, select the Custom Audience you created from your email list.
- Next, you’ll set up other campaign elements like your budget, ad schedule, ad format, and ad copy.
Step 6: Optimize your advertising campaign
Once your ad campaign is set up, make sure to monitor and optimize it for maximum effectiveness. You can track your ad performance through Ads Manager, where you’ll see important metrics like click-through rate (CTR), cost per action (CPA), and conversion rate.
Note: Ads targeting email lists typically have higher engagement and conversion rates because you’re reaching people who already have a relationship with your business, such as past customers, people who have made a purchase, or people who have signed up for your newsletter.
Step 7: Improve your campaign using lookalike audiences
Once your ad campaign has been running for a while and you have an effective custom audience, you can expand your target audience by creating a Lookalike Audience. Lookalike audiences are people who behave and behave like people on your email list. This helps you reach new customers who are more likely to convert. To create a lookalike audience, go to Ads Manager, select Audiences, then click Create Audience and select Lookalike Audience. You’ll select the custom audience you created and let Facebook find people with similar characteristics.
Tips to get customer email via Facebook
If you’re looking for a way to reach potential customers and boost your advertising campaign, there’s no reason not to get started right away. Launching a Facebook advertising campaign can yield incredible results, and if done correctly, it can be an effective way to grow your business. Let’s take a look at the specific steps to get your advertising campaign started easily and effectively.
Step 1: Create a landing page
Creating a landing page or squeeze page is essential to the success of your advertising campaign. The landing page should be a standalone and unique design, not just a part of your blog or website. This adds a professional look and helps customers focus on the main goal of the campaign.
When designing a landing page, make sure that the images and text on the page are attractive and engaging. These elements must highlight the advantages of the product or service you are promoting. Furthermore, the registration process on the page must be simple, easy to understand and not boring for users. An optimized landing page will help customers easily access information and increase the possibility of converting potential customers into actual customers.
Step 2: Log in to Facebook and navigate to your fanpage blog page
Once you have your landing page ready, the next step is to create a presence on Facebook. For your campaign to work effectively, you need a Facebook fanpage. This is the platform that helps you connect with customers and deploy advertising campaigns professionally. Once you have a fan page, log in to Facebook and navigate to your fan page blog. On the page’s Wall, write a short, but attractive introduction that encourages users to visit your landing page. For example: “Have you downloaded this free eBook yet? If not, SEIZE THE OPPORTUNITY before it’s too late!” Then, attach a link to your landing page. This is how you create a strong call to action for users to click and access detailed information.
Step 3: Promote the post with the “Boost Post” button
Once you have published your introduction post on your fan page, the next step is to get your post in front of a larger audience by using the “Boost Post” button. This is a great tool to promote your post to your desired target audience. To do this, simply look at the bottom right of your fan page post, where there will be a “Boost Post” button. When you click on this button, a new window will appear, allowing you to set up your advertising campaign.
In this dialog box, you can adjust the necessary parameters, including the price for the entire campaign. You can start the campaign with a small budget, such as $5, and adjust it later depending on how well the campaign is performing. Additionally, you will need to define the campaign objective (e.g. increase reach, engagement, or conversions) and choose a payment method (credit card or PayPal).
Once you’re done setting it up, if you’re happy with your selection, simply hit the “Boost Post” button and your campaign is officially live. Facebook will quickly deliver your ad campaign to your target audience, helping you increase your visibility and attract potential customers.
Contact Info
Information about “How to add email list to Facebook ads” hopes to provide you with additional necessary knowledge. At Rent FB, there is a team of highly qualified and experienced staff and experts who will provide facebook account for ads as well as support when you run Facebook ads. Contact us via phone number.
Switching your advertising account from personal to business offers many outstanding benefits, helping to optimize advertising campaigns and enhance management capabilities. When using a business account, you can take advantage of Meta Business Suite’s professional tools, such as managing multiple accounts, assigning access rights, and tracking campaign performance in more detail. This is especially important for businesses that want to build a strong social media presence and maximize advertising potential. The conversion process is also quite simple, just taking a few basic steps in Meta’s account settings.
Adding a Page to your Facebook advertising account is an important step to help you manage and execute effective advertising campaigns. When you link your Page to your advertising account, you can easily create, track, and optimize ads directly from your page. To do this, simply go to Business Manager, select Ad Account Settings, then add a Page to your account by entering the Page name or ID. This process helps ensure that all advertising activities are synchronized and easily managed, bringing higher efficiency to your brand promotion strategy.
Adding your email list to your Facebook ads helps you create more targeted, personalized marketing campaigns and increase conversion rates. Using Custom Audiences and Lookalike Audiences, you can optimize your ad campaigns to not only reach your current customers but also expand your potential audience, delivering the best results for your business.